Taking video notes in Obsidian is the difference between watching a video and building a permanent, searchable knowledge base. The challenge is closing the gap between fleeting video content and your local-first vault, turning hours of tutorials into insights you actually own.
Why Passive Video Learning Doesn't Work
We’ve all been there. You watch a two-hour lecture on YouTube or a Udemy course and feel productive. A week later, most of that information is gone. This is the core problem with passive watching—it creates the illusion of learning without building durable knowledge.
The typical "solution" of manual note-taking is often worse. You're constantly pausing and rewinding, scrambling to type in another window. You take screenshots of diagrams or code, but they end up in a random desktop folder, disconnected from the notes they were supposed to illustrate. This constant context-switching shatters your focus and kills any learning momentum. The awkwardness of writing in a notebook while watching a screen is a real barrier.
The Problem of Lost Context
The biggest failure of most note-taking methods is losing visual context. A transcript tells you what was said, but it misses what was shown. That subtle mouse movement in a software tutorial, the specific line of code being highlighted, or the formula on a whiteboard—all of that crucial information is lost. Visuals matter.
Real value comes from connecting your written insights directly to the visual source. An effective system for video notes must preserve this link, letting you jump back to the exact moment a concept was explained on screen.
Bridging the Gap with the Right Tools
The rise of video-based learning created a need for better tools. This is why Obsidian plugins like Media Notes became popular, racking up over 21,978 downloads, and why extensions like HoverNotes have over 8,000+ Chrome installations.
Unlike tools that only parse transcripts, some modern tools watch the video frame-by-frame to generate notes, just like a human would. This captures visual context that transcript-only tools miss. HoverNotes is a Chrome extension that does this, exporting everything as plain Markdown that drops right into your Obsidian vault. You can see more data on plugin popularity over at Obsidian Stats.
The goal isn't just to take notes. It's to create an integrated system where video learning flows into your permanent knowledge base. For serious Obsidian users, this means finding a workflow that saves notes as clean, local Markdown files—complete with timestamped screenshots that link back to the video. Your notes belong to you. You can learn more about how to capture effective video notes in our detailed guide.
Choosing Your Video Note-Taking Method
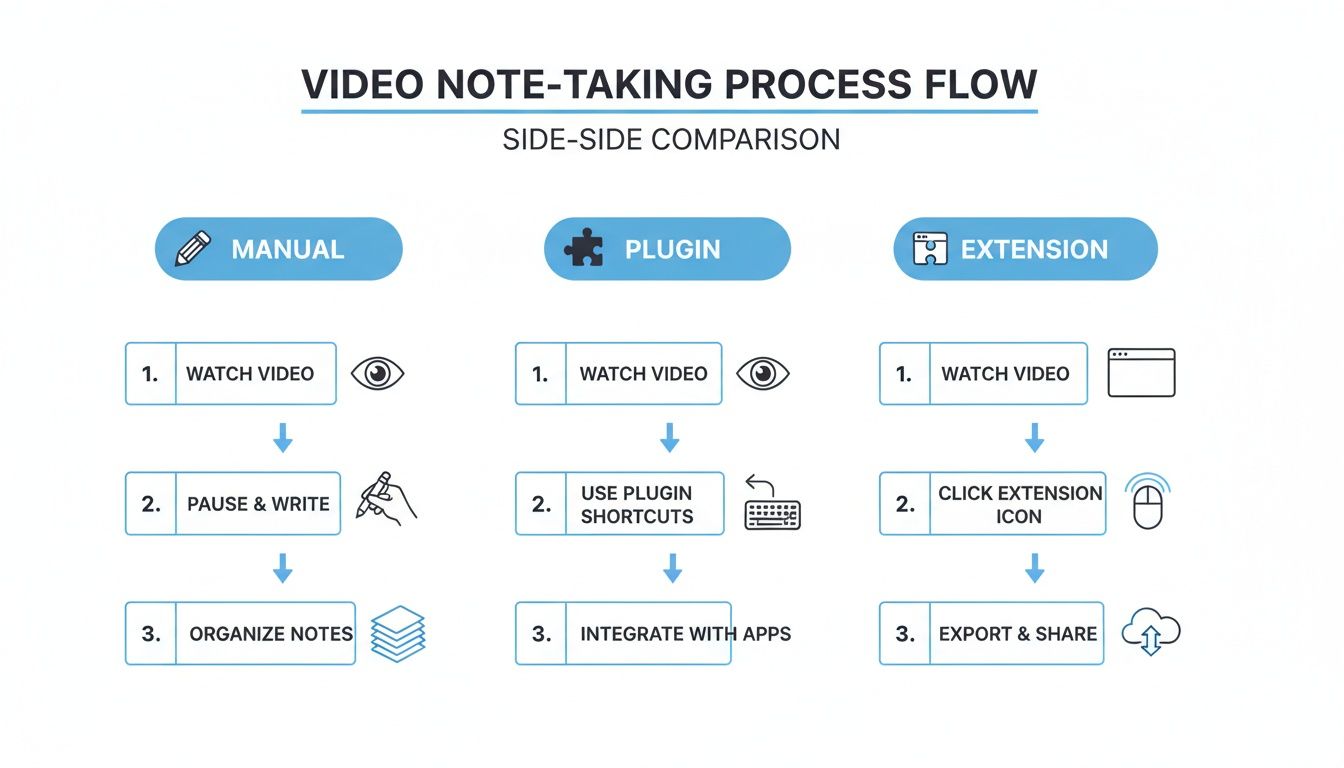
So, how do you get video notes into Obsidian? You have a few options, and the right approach depends on how you learn and what friction you're willing to tolerate. Most workflows fall into three categories. Understanding their trade-offs is key to building a system you'll actually use.
Let's look at the practical pros and cons of each.
The Manual Workflow
This is the default method: video playing on one side, an Obsidian note open on the other. You watch, type, pause, screenshot, save the file, and drag it into your note.
The appeal is absolute control. The reality is that it’s a tedious, friction-filled process. The constant pausing, app-switching, and file management breaks your focus. Worse, your notes and screenshots are disconnected from the video's timeline, making it hard to find the original context later.
Integrated Obsidian Plugins
The next step for many is an Obsidian plugin like Media Notes. These tools let you embed a video player directly inside a note by pasting a URL from sites like YouTube or Vimeo. This is a huge win for focus, as everything is contained in one window.
But this approach has its own issues. Plugins are often limited to specific platforms and can break when those sites update their code. More importantly, you're still doing all the heavy lifting—manually typing, pausing, and trying to capture timestamps. They integrate the player, but they don't automate the note-taking.
Browser Extensions
The third option is a browser extension that captures notes while you watch on any website—Udemy, Coursera, YouTube, or even a private university portal. Tools like HoverNotes overlay a note-taking panel directly next to the video.
This approach offers a massive jump in efficiency and compatibility. With one click (or a keyboard shortcut), you can grab a timestamped screenshot and drop it into your notes. The best tools in this category even use AI to generate notes by capturing both spoken dialogue and on-screen text. When you're done, the notes save as clean .md files directly to your Obsidian vault.
"Notes save as .md files directly to your Obsidian vault, no proprietary format or sync service - your notes belong to you."
The trade-off is that the initial capture happens outside of Obsidian. But for many, this "capture now, organize later" philosophy is far less disruptive to the learning process. You can learn how to structure these notes using the Cornell Method for video note taking in our other guide.
Comparison of Obsidian Video Note-Taking Methods
This table compares the three methods. Think about what you value most—is it total control, a unified workspace, or pure speed?
| Method | Pros | Cons | Best For |
|---|---|---|---|
| Manual Workflow | Total control over format, completely free. | Extremely slow, high friction, no link to video timeline. | Short videos or users who want absolute control. |
| Obsidian Plugins | Keeps video and notes in one window, good integration. | Limited website support, relies on plugin maintenance. | Users who primarily learn from YouTube and want a contained environment. |
| Browser Extensions | Works on any site, timestamped screenshots, AI automation. | Initial capture happens outside Obsidian. | Learners who value speed, efficiency, and platform flexibility. |
The best system is the one that removes the most friction. For most people learning from various video sources, the flexibility of a browser extension is hard to beat.
How to Set Up a Direct-to-Obsidian Workflow
The best system for video notes is one that removes as much friction as possible. Manually importing files or copy-pasting text adds small hurdles that can make you abandon the habit. The solution is a direct-to-Obsidian workflow.
By setting this up, your notes automatically land where they belong, cutting out tedious middle steps. The key is a browser extension that can write files directly to your computer. This lets you point the extension’s save location to a folder inside your Obsidian vault, creating a seamless bridge from browser to knowledge base.
Finding Your Obsidian Vault Path
First, you need to know where your Obsidian vault lives on your computer. This is the local file path to the folder containing your notes.
To find it:
- Open Obsidian.
- In the bottom-left corner, click the vault switcher icon (it looks like a vault door).
- Hover over your vault, click the three-dot menu, and choose "Reveal vault in system explorer" (or "Show in Finder" on a Mac).
A file explorer window will open to your vault's location. This is the path you need. On Windows, it might look like C:\Users\YourName\Documents\Obsidian\MyVault.
Configuring the Extension to Save Directly
With your vault path handy, you can connect your browser to Obsidian. For this walkthrough, we’ll use HoverNotes, a Chrome extension that can watch videos with you, generate AI notes, and save them as Markdown files directly to your machine.
Once installed, go to the extension's settings and find the "Default Save Location" option. Paste your vault path there.
Here's a tip: create a dedicated folder inside your vault for these captures, like VideoNotes. This keeps raw video notes separate from your polished, permanent ones. Your final path might look something like .../MyVault/Resources/VideoNotes. Set that path, and you're done. From now on, every saved note will instantly appear as a new .md file in that folder.
As you can see, the extension method cuts straight to the point, dropping notes directly into your vault.
Your First AI-Powered Video Note
Now find a video on any platform—YouTube, Coursera, Udemy, or a lecture recording. Start the extension and let it generate notes. You can add your own thoughts or use the snip tool to grab a screenshot of a specific diagram or code block.
Unlike tools that only parse transcripts, HoverNotes watches the video to capture what's actually on screen. When you're finished, hit save.
The note, complete with your additions and timestamped screenshots, lands directly in your vault folder as a clean Markdown file. When you open Obsidian, it’s already there.
This "capture now, organize later" approach lets you stay immersed in the video, knowing key points are being saved in a format you fully own. You can dive deeper into the specifics of connecting HoverNotes and Obsidian in our full integration guide. Every screenshot includes a clickable timestamp—one click returns you to that exact moment in the video.
How to Organize Your Video Notes in Obsidian
Dumping notes into your vault is just the first step. To turn that raw information into durable knowledge, you need a system. Without one, your vault can become a digital junk drawer. The goal is to weave new insights into your existing knowledge graph.
Use Tags and Metadata for Quick Context
Tags are the fastest way to add context to a note. A simple, consistent tagging system helps you instantly find everything related to a topic, source, or project.
Start with a few core tags for every video note:
#video-note: A high-level tag to see all notes from videos.#source/youtubeor#source/udemy: Get specific about where the info came from.#course/aws-certification: For a series or online course, create a dedicated tag to group all related lecture notes.
Using nested tags like source/youtube gives you a clean hierarchy for searching without rigid folder structures.
Forge Connections with Wiki-Links
This is where the real power of Obsidian comes in: creating bidirectional links between notes. As you review your video notes, actively look for opportunities to link concepts to other notes using the [[wiki-link]] syntax.
For example, if a video mentions "asynchronous JavaScript" and you already have a note on that topic, link it: [[asynchronous JavaScript]]. If you don't, creating the link generates a placeholder for a new note, prompting you to define that concept later.
This simple habit is what turns a collection of random notes into a genuine knowledge base. Each new link forces you to see how new information connects to what you already know, deepening your understanding.
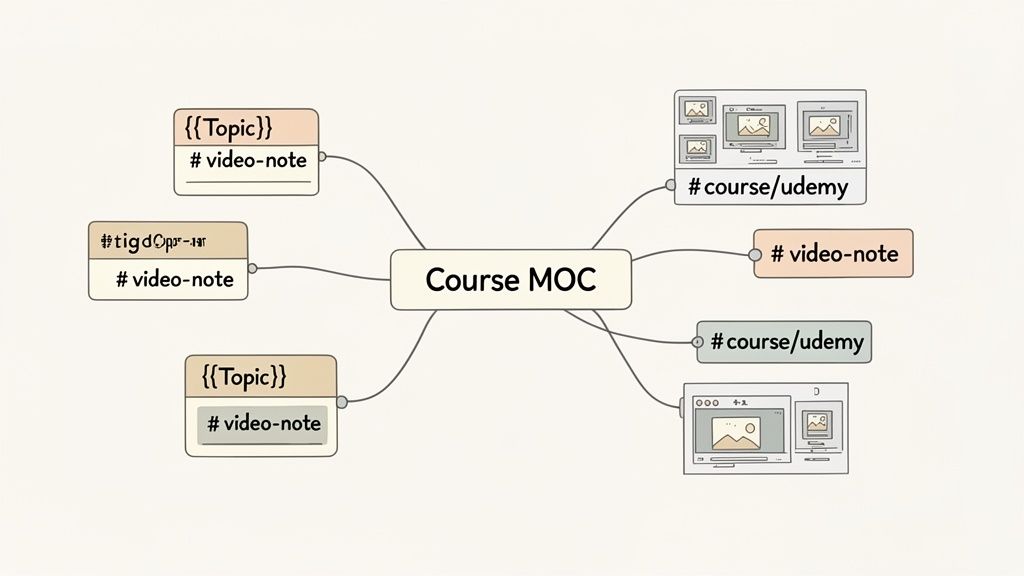
Build Maps of Content for Courses
When working through a multi-part video course, create a central hub that links to all the individual lecture notes. This is often called a Map of Content (MOC).
Think of an MOC as a table of contents you build yourself. Create a new note—like [[AWS Certification Course MOC]]—and then list and link to each video note from that course in order. This gives you a bird's-eye view of the curriculum, making it easy to review. You can learn more about this technique in our guide on how to create a knowledge base.
The Power of Interactive Timestamps
One of the most useful features of a good video note-taking workflow is the clickable, timestamped screenshot. In Obsidian, these images become interactive portals back to the source material.
If you're reviewing a note and can't recall a detail, just click the screenshot. A tool like HoverNotes will open the original video and jump to that exact moment. This bridges the gap between your summary and the source video, saving you from scrubbing through timelines to find one specific clip.
Advanced Automation and Productivity Tips
Once your system for piping video notes into Obsidian is set up, you can make it faster and smarter. A few automations can slash the manual work, letting you focus on the content, not the note-taking mechanics.
The goal is to minimize cognitive load while learning. Every second spent on file names or tags is a second you’re not absorbing the material.
Automate Metadata with Obsidian Templates
Obsidian's templating feature is a game-changer. Using either the core Templates plugin or the more powerful community plugin Templater, you can automatically add a consistent structure and metadata to every video note. Instead of typing the same info repeatedly, a template pre-fills it for you.
A simple video note template might include:
- Source URL: A placeholder for the video link.
- Channel/Creator: To track the source.
- Date Captured: Using a dynamic variable like
{{date}}that fills in automatically. - Tags: Instantly add
#video-noteand maybe a#reviewtag.
This ensures every note starts with a clean, organized foundation. When a new Markdown file lands in your vault, you just run one command to apply the template.
Master Keyboard Shortcuts to Stay in the Flow
Constantly switching between the mouse and keyboard kills focus. When taking notes from a fast-paced video, keyboard shortcuts are essential. A tool like HoverNotes is built for this. You can assign keyboard shortcuts to its core actions, letting you drive the entire process without your hands leaving the keyboard.
"Keyboard shortcuts let you screenshot and navigate without breaking your flow."
Set up custom shortcuts for actions like:
- Capture a full-frame screenshot.
- Snip a specific region of the screen (to grab just a code snippet or diagram).
- Toggle a distraction-free video mode.
- Play, pause, and adjust video speed.
The muscle memory you build pays off immediately. You stop thinking about the tool and focus only on the content. Pairing this with AI that can handle the note-taking allows you to focus solely on understanding. You can explore different AI note taker apps to see how they fit into a keyboard-driven, local-first system.
A Few Common Questions About Video Notes in Obsidian
As you dial in your workflow, a few questions usually come up.
Can I Actually Take Notes from Videos on Sites Like Coursera or Udemy?
Yes. While some Obsidian plugins are built specifically for YouTube, a good browser extension works on any platform. Tools like HoverNotes are designed to function on any website with a video player. This means you can use the same process for a Coursera course, a Udemy tutorial, a LinkedIn Learning class, or a private lecture portal. It works anywhere there's a video.
What's the Real Difference Between a Plugin and an Extension?
It comes down to where the tool does its work.
- An Obsidian plugin runs inside your vault. You paste a video URL into a note, and it embeds a player. It keeps everything in one window.
- A browser extension runs in your browser. It lets you capture notes while watching on the original site, then saves the finished Markdown file directly to your Obsidian vault.
The extension approach generally offers more flexibility, works on more sites, and includes features like distraction-free video modes that plugins can't provide.
How Do I Capture Visuals Like Diagrams or Code?
Describing a complex diagram or re-typing code is slow and error-prone. The best solution is a tool that captures timestamped screenshots. When you see a critical formula or code snippet, you hit a hotkey.
A good workflow embeds that screenshot directly into your Markdown notes. Even better, clicking that image later in Obsidian jumps you back to the exact moment in the video, providing crucial visual context that text can't match.
Are My Notes Saved in an Open Format?
This is non-negotiable for anyone who values owning their data. Prioritize tools that save your notes as plain Markdown (.md) files. This makes your knowledge future-proof and prevents it from being locked in a proprietary app. A local-first tool saves these files directly to your computer. You own the files. Move them, back them up, grep them—they're just Markdown. Your notes are yours, forever.
If you use Obsidian for learning, HoverNotes saves notes directly to your vault as clean Markdown. The timestamp screenshot feature alone saves hours of rewatching. You can try it free—20 minutes of AI credits, no credit card required, at https://hovernotes.io.